Moiré Tell-Tales are generally fixed using adhesive. Screws can be used to provide additional security, but are not usually necessary unless fixing to a surface with low integrity.
Here’s a video of an installation:
We recommend the use of high initial grab, gap filling adhesive for fixing Moiré Tell-Tales. We have tested CT-1 and Power Grab-n-Bond both from the CT1 company. In dry conditions, Grab-n-Bond is preferred as it is stiffer, which makes setting the tell-tale at installation easier. CT-1 has the advantage that it can be used even underwater. No More Nails Waterproof/Exterior 0 second grab also seems to work well and is readily available (e.g. from B&Q).
- Ensure that the surfaces to be fixed to are clean and free of loose material. Weathered masonry or metal corrosion may result in a poor bond, and such surfaces should be cleaned with a wire brush.
- Decide how to locate the Moiré Tell-Tale. The parts must be mounted on either side of the crack such that the areas marked with rings overlap. Interpretation is easiest if the Tell-Tale is mounted horizontally or vertically.
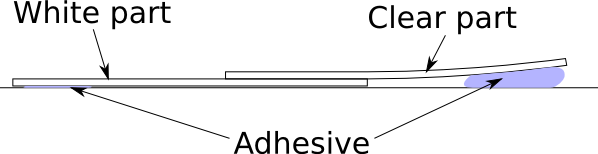
- Turn the clear part face down (so the QR code is not visible) and apply a generous bead of adhesive to the end with the screw holes. Ensure adhesive is applied so that it will ooze into the screw holes when the part is pressed into place.
- Apply the part in approimately the correct position, only pressing enough to ensure that the part does not drop off.
- Turn the white part so the printing is face down and apply adhesive to the end with the screw holes. Less adhesive is needed for this part, but too much is better than too little as excess can be squeezed out by pressing firmly.
- Slide the rings of the white part behind the free end of teh clear part, position and press firmly into place.
- Now adjust the positioning of the clear part such that:
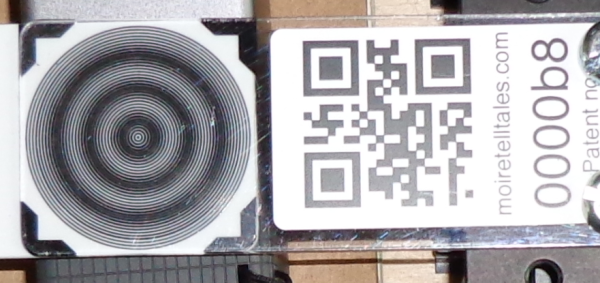
- The two parts are centered such that a set of three concentric circular fringes are visible, as shown here:
- The inside faces of the two parts are in contact and will remain in contact if the crack moves. This ensures that the tell tale can be read unambiguously from any angle. Check by pressing gently on the clear part over the fringes in different positions, and adjust the positioning of the clear part on its thick bed of adhesive:
- The two parts are centered such that a set of three concentric circular fringes are visible, as shown here:
The reason for using a generous bead of adhesive on the clear part is that it is thereby spaced off the wall slightly, and can then be angled down to press gently against the other part. This will ensure that the parts stay in contact.